Friday, 17 January 2014

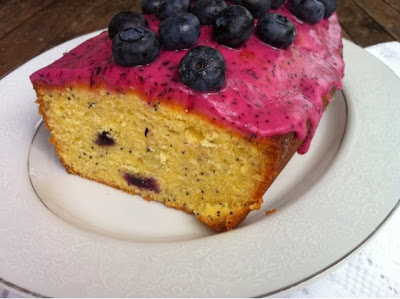
Blueberry and Lemon Drizzle Loaf

This post is dedicated to my lovely mother-in-law, Wendy Singer. She is turning a grand age of 80 and we are off down south to celebrate her birthday.  Lots of family and friends and plenty of memories to be made.  Before we do that we are spending 6 days at Lake Rotoiti with Graham's brothers and their families, so lots of fun and food.

I was really inspired by Kim Evan's blueberry and poppy seed loaf that I decided to bake Wendy's Lemon cake and incorporate the poppy seeds and blueberries.

The result was a gorgeous moist cake, with an amazingly simple icing.

125g Butter
1 Cup caster sugar
2 Eggs
11/2 Cups self raising flour
1/2 Cup Milk
Pinch of salt
Grated rind of 1 lemon
1Tbl Poppy Seeds (optional)
1 Cup of fresh blueberries (you can use frozen too)

Topping
1/3 Cup Lemon Juice
1/4 Cup Castor Sugar

Blueberry Icing
11/2 Cups Icing Sugar
1/4 Cup Blueberries


1. Preheat oven to 180c, grease and line a loaf tin approx. (23cm x13cm) I have a silicone one so didn't need greasing.
2. Cream together the butter and sugar until light and fluffy, add eggs one at a time, making sure you beat well in between.
3. Then add the flour, salt and milk, mixing well, then the lemon rind and poppy seeds (optional) although I think it adds a wonderful crunch to the cake
4.  Spoon a third of the mixture in your prepared tin and then dot some blueberries in the mixture, do this until all the mixture is in the tin. Top with remaining blueberries.
5. Bake for 45-50 min or until the skewer comes out clean

For the Topping
Mix the lemon juice and caster sugar in a pan over a low heat until the sugar is dissolved, Pour over the cake while it is still hot and still in the tin. Cool in the tin and then turn out and ice.

Blueberry Icing
A gorgeous simple icing that takes minutes to make.  Blitz the blueberries and icing sugar in a food processor until it is spreadable consistency then spread over the cooled cake,  and decorate with the rest of the blueberries, the result is fabulous!


Happy Birthday Wendy, we all hope you have a lovely day with your family and friends.  Lots of love xxxx


Enjoy!
Till next time
 
Ashia

Friday, 10 January 2014

Cassava Chips with a Tamarind Chutney

This is one of my favourite things to eat, a real treat, and one that brings back so many lovely childhood memories from Malawi, where I grew up. Cassava is a root vegetable similar to yams. It is native to Central and South America. And is also a staple food in Africa and Asia. You can use it like potatoes, boil, bake, fry and mash. Although I either fry it or use it as a base for my mum's chicken and cassava casserole.
You can buy it frozen in any Asian/Indian food store. It usually comes in a large 1 kg bag and you boil it from frozen.

Frozen Cassava
Oil for frying
1-2 Eggs beaten
salt and Chilli powder (optional)

1. In a large saucepan add 4-5 chunks of cassava and boil for 30-40 min, until tender. Once the cassava is cooked, it should be fairly firm but easy enough to slide a fork through it.

2. The next step is important, once cooled you need to cut the chunks length ways in half and remove the stalk from the middle, then cut into chunky chips.


3. Heat oil in a wok or deep frying pan and add the cassava chips to the beaten egg and coat, then slowly place them in the oil, fry until golden, strain and place them in a dish with a paper towel to soak the excess oil.
4. Sprinkle with salt and chilli powder ( I like the this way) and serve with a tamarind chutney.
Tamarind Chutney

This is a dark sweet and sour chutney, used as a dipping sauce. Used in India like Ketchup is used in the West. You can get small tubs of it in Indian supermarkets and it is concentrated.

150 mls water
3-4 Tsp of tamarind paste
1/4 cup of dark brown sugar
1/2 tsp cumin and salt, pepper to taste
1/4 tsp chilli

Add all this in a saucepan, simmer for 6-8 min and then cool, it will get thick and syrupy as it cools. It keeps well in the fridge for 3-4 weeks.


Enjoy!

Till next time

Ashia


Thursday, 9 January 2014

Crispy Beef with Egg Fried Rice

This is a simple stir fry dish, that hardly takes any effort.  Perfect for a mid week meal that doesn't  take any time to put together. This recipe is enough for 2 adults and 2 children, you can always add more for a larger number of people

500g beef stir fry
8-10 mushrooms
1 Cup  green beans ( you can use fresh or frozen) oil for frying
2-3 Tbls cornflour
2 cloves garlic, crushed
some grated ginger
2 Tbls Teriyaki sauce
2 Tbls Soy sauce
1 Tbl sweet chilli sauce
3 eggs

1. Add the crushed garlic and ginger to the beef strips and set aside, cut the mushrooms into quarters.
2. Mix all the sauces together in a bowl and set aside
3. Put cornflour in a bowl and then add the beef strips to this, coating well
4. Heat oil in a large wok, you will need about 100-150 mls of oil, fry the beef strips in batches until golden, remove and set aside on paper towls, remove most of the oil, leaving enough to stir fry the vegetables
4. stir fry the green beans and then the mushrooms, add the sauce and then lastly crispy beef  just before serving, so the beef doesn't get soggy.

Serve with fried rice (see earlier post), with my egg fried rice, I cook the rice and then separately, whisk the eggs and make an omelet, cut into strips and stir through the rice.  Simple.


Carrot & Beet salad

I had this yummy salad at a friends the other day for lunch, it tasted divine! It was quick and easy, so I thought I would share my version.

For 3-4  people

5 medium carrots - grated, put aside
1/2 medium beetroot - again grated ( I went all out and used a whole one, hence the very red colour) you can use as much or as little as you want
1 can drained chickpeas
1/2 cup dry roasted peanuts
1/2 cup dry roasted cashews
handful of pine nuts
1/2 tsp garam masala
1 tsp cumin
1 Tbls olive oil

In a large frying pan, heat oil and add the spices, then add the chickpeas and all the nuts, fry off on a high heat for 3-5 min. Remove put aside to cool.
Just before serving toss the carrots and chickpea mixture and then add the grated beets, serve as a side with a meat dish or with some hot focaccia as a light lunch

 
Enjoy!
 
Till next time
 
Ashia

Saturday, 4 January 2014

Gifts from my kitchen


There is nothing more satisfying than gifting food. For me it is one of those life's simple pleasures, that comes with an abundance of love and gratitude, given to special people that make a difference in our lives.

This year, my 3rd was no exception and I decided to carry on my little tradition that I started two Christmases ago when we arrived back in New Zealand.  Although this year was frantic and a wee  bit stressful, as we had just moved house 2 weeks before Christmas!

I have neglected my blog, although I have been taking photos of the food I have been cooking and the baking that has been done, sitting down and putting it all  together  on my blog has just been an impossibility.  Today has been the first time in over a month, that I have decided to finish all the drafts  of my posts and publish them!

So apologies for my lateness, but I hope you will enjoy my posts.  I  did not manage the last post for 2013 and wishing all my readers a merry Christmas, but I will post these  rather late Christmas blogs in the hope that it gives you ideas for the next festive event or foodie gift that you decide to make. 

I made my gifts this year of the Christmas fudge, coconut ice and mini mince pies, I found some gold star platters and tied them all up in cellophane and shimmery ribbon, perfect Christmas gift.

The  Christmas fudge has a dedicated post , the coconut ice is a yummy very sweet treat that is a must over Christmas.

Lots of versions around, this one was  the best.

Coconut Ice

White Layer
1/2 can of condensed milk
250g icing sugar
160g desiccated coconut

Pink Layer

1/2 can condensed milk
250g icing sugar
190g desiccated coconut
5 tsp raspberry essence

1.  Grease a 20 x 30 cm slice tin or any shallow  square or rectangle tin

2. Mix the ingredients of the white layer  until it is  combined well, then press down into the tin

3. Mix the ingredients of the pink layer and presss firmly down on to the white layer

4. Chill before cutting into desired sizes.


Mini Mince Pies

I used ready made sweet shortcrust pastry slab, and  24 hole mini muffin tin.

1 pkt 500g unrolled sweet pastry

1 jar mincemeat  (I used the Tasti one)

1/2 pkt  of white ready to roll marzipan or royal icing

icing sugar for dusting

1. Cut the pastry in two halves, using one of the halves cut into 24 even squares and then roll into balls.

2. Place each ball into the muffin tin and press down until you have 24 pastry shells.

3. Place the mincemeat into each shell, bake in a pre heated oven at 200c for 15-18 min.

4. Leave to cool, in the meantime roll out the icing and cut into stars, and then place the stars  onto the pies and dust with icing sugar!


Best wishes for  2014
 
 
Enjoy
 
Ashia


Cranberry and White Chocolate Fudge

I have seen versions of this gorgeous fudge and decided that this was by far the easiest and most Christmassy.  this is adapted from Natalie Oldfield.  I love that it combines all the colour of Christmas and I have then added a touch of sparkle which just gives it a touch of festive decadence.

You can add any combination of berries and nuts, may be some glace cherries and marshmallow for a rocky road fudge and maybe use dark chocolate too, experiment, that is what its all about.

I made a whole batch of this and gave it away as Christmas gifts, so personal and satisfying.

1 can of condensed milk  (395g)
zest of 3 limes
375g white chocolate (I used Cadbury
3/4 cup shelled and chopped pistachios
1 cup dried cranberries (I used craisons)

1. Grease a 22cm square tin or a rectangular one if you don't have a square one

2. In a saucepan, over a medium heat add the condensed milk and lime zest, until the milk starts to simmer, turn to a low heat making sure that it doesn't burn, simmer until the milk starts to thicken

3. Remove from heat and add the chopped white chocolate and mix until it has melted, then add the berries and nuts and mix.  Pour into the tin and refrigerate for at least 2-3 hours, slice and devour!

Enjoy!

Till next time

Ashia